


Hello again with a new lightweight article that will touch on in-depth the step-by-step implementation of a real-time contact form using the Laravel Livewire framework.
What is Livewire?
Livewire is a full-stack framework that will make your life easier in the process of building dynamic interfaces in Laravel. It allows you to focus on building awesome applications instead of getting stuck with how to implement the features or writing a complex bunch of JavaScript code.
Enough talking let's build some magic... 😋
Installation and basic setup.
I will assume that you have a fresh brand new Laravel project.
First, we need to install Livewire in our project by running the following command in the terminal.
composer require livewire/livewire
Once Livewire is installed successfully, You must include the Livewire javascript and styles files on every page that will be using Livewire in my case I will include them in my layout file and extend it anywhere I want to use Livewire.
This will happen by adding @livewireStyles inside the head tag and @livewireScripts right before the closing body tag.
So, the views/layouts/app.blade.php file will be like:-
    @livewireStyles
</head>
<body>
    @yield('content')

    @livewireScripts
</body>
And I will create a home.blade.php file to extend the app layout inside it.
@extends('layouts.app')
@section('content')

@endsection
Let's update our web.php route file to load our home view file.
Route::get('/', function () {
    return view('home');
});
Now run php artisan make:model Message -m to create the Message model and migration.
Then add the following columns to the message's migration file.
$table->string("name");
$table->string("email");
$table->text("message");
And in the Message.php model add the fillable property.
protected $fillable = ['name', 'email', 'message'];
Don't forget to configure your DB variables in .env file and run the migrations
Congrats 🥳, now you are ready to create your first Livewire component.
Creating a Livewire component.
let's create our contact form component by running this command in your terminal.
php artisan make:livewire contact-form
Of course, you're free to choose the component name.
This is supposed to be the message after executing the previous command or a similar one.
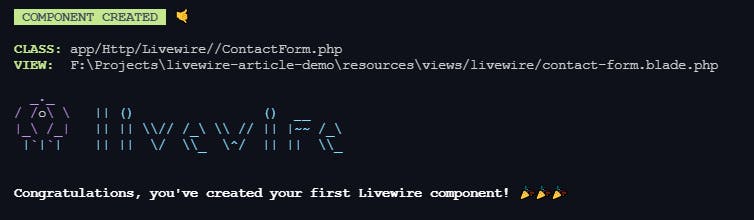
As we see there are two Livewire directories created with a file inside each one of them.
- The blade file inside the views/livewire directory
contact-form.blade.php. - The component class inside the Http/Livewire directory
ContactForm.php.
Before, going deeper, let's take a close look at the render method in the ContactForm.php class.
use Livewire\Component;

class ContactForm extends Component
{
    public function render()
    {
        return view('livewire.contact-form');
    }
}
Whenever the initial page is loaded or the component is updated the render method will be called automatically and render the component view file with the new updates.
Let's include our component view file in the home.blade.php file using @livewire blade directive.
@extends('layouts.app')

@section('content')

@livewire('contact-form')

@endsection
It's the time for building our form now 😊.
Go to contact-form.blade.php and add these HTML form lines (Just for simplicity I will style it later, check the project repo on my Github)
    <form>
        @csrf
        <input type="text" placeholder="Enter your name">

        <input type="email" placeholder="Enter your email">

        <textarea placeholder="Write your message"></textarea>

        <button type="submit"> Send Message </button>
    </form>
IMPORTANT NOTE: A single root element is a MUST for any Livewire component to work fine.
Livewire automatically provides the public data in the component PHP class for the component blade file without needing to pass it manually to the view also keeps track of any changes that happen in these public properties and automatically render them to the front-end.
So, We will add our contact form fields as public properties inside the ContactForm.php class.
Shall we do some code to make it clear?
class ContactForm extends Component
{
    public $name;
    public $email;
    public $message;

     ...
}
Now, These properties are accessible in the contact-form.blade.php file.
For example, If you have public $test = "Hello World!" in the component class and you type {{ $test }} in your blade then you will see in the browser "Hello World!". If any change happens to the $test property Livewire will automatically make an AJAX request to the server with the changes and the server will re-render the component and respond with the new HTML.
Now we want to bind the data (name, email, message) from our front-end component blade file to our public properties in the component class so, thus any changes that happen in certain HTML element values will be synchronized automatically with the particularly public properties in the component class. That happens by adding wire:model= " property name " in the input HTML element.
Let's do that, In contact-form.blade.php file...
<form>
    @csrf
    <input wire:model="name" type="text" placeholder="Enter your name">

    <input wire:model="email" type="email" placeholder="Enter your email">

    <textarea wire:model="message" placeholder="Write your message"></textarea>

    <button type="submit">Send message</button>
</form>
Any data will be typed in the input field, Livewire will listen to that particular input event and send an AJAX request with the new data to re-render the component with it.
By binding our data to the component class through wire:model now we need to save that data in our database or do whatever else we need So, we need to submit our form to perform the saving process.
<form wire:submit.prevent="saveMessage">
what does this line do? 🤔
Simply, It prevents the default form submission and when the form is submitted the saveMessage method in the component class will be executed immediately.
We need to implement that method with some form validation and another one to reset our form fields from the data to make it ready for the next message.
In 'ContactForm.php' class.
protected $rules = [
    'name' => 'required|min:4',
    'email' => 'required|email',
    'message' => 'required|min:16',
];

public function saveMessage(){

    $this->validate();

    Message::create([
        'name' => $this->name,
        'email' => $this->email,
        'message' => $this->message,
    ]);

    $this->resetFormFields();
}

public function resetFormFields()
{
    $this->reset(['name', 'email', 'message']);
}
Let's explain what happens here👆.
Livewire is shipped with the $rules property by default to set the validation rules for each property's data and the $this->validate() method to use these rules to validate the values inside our component public properties.
After that, we created the message and save it to the database, then we reset the values using our resetFormFields method which uses Livewire built-in reset method to clear our public properties values and therefore, the form fields will be empty and ready for the next message.
The final thing, We're almost done 🤩.
We need to notify the user of the error messages if the validation failed. The standard Laravel @errors object will be available inside our view file if any ValidationException thrown.
Now, let us see the whole code to make everything clear.
The contact-form.blade.php file
<form wire:submit.prevent="saveMessage">
    @csrf
    <input wire:model="name" type="text" placeholder="Enter your name">
    @error('name') <span class="error">{{ $message }}</span> @enderror

    <input wire:model="email" type="email" placeholder="Enter your email">
    @error('email') <span class="error">{{ $message }}</span> @enderror

    <textarea wire:model="message" placeholder="Write your message"></textarea>
    @error('message') <span class="error">{{ $message }}</span> @enderror

    <button type="submit">Send message</button>
</form>
The ContactForm.php file
<?php

namespace App\Http\Livewire;

use Livewire\Component;
use App\Models\Message;

class ContactForm extends Component
{

    public $name;
    public $email;
    public $message;

    protected $rules = [
        'name' => 'required|min:4',
        'email' => 'required|email',
        'message' => 'required|min:16',
    ];

    public function saveMessage(){

        $this->validate();

        $message = Message::create([
            'name' => $this->name,
            'email' => $this->email,
            'message' => $this->message,
        ]);

        $this->resetFormFields();
    }

    public function resetFormFields()
    {
        $this->reset(['name', 'email', 'message']);
    }

    public function render()
    {
        return view('livewire.contact-form');
    }
}
Congratulations 🏆, now you have an awesome, real-time contact form working.
Bonus Tip 🏅.
If you want to provide a flash message to the user with success or failure after submitting the form, Livewire can do that through a session.
Update the saveMessage method in the ContactForm.php class
public function saveMessage()
{
    $this->validate();

    $message = Message::create([
        'name' => $this->name,
        'email' => $this->email,
        'message' => $this->message,
    ]);

    if ($message)
    {
        session()->flash('success', 'Thank you for your Message.');
    }
    else
    {
        session()->flash('error', 'Failed to send your message.');
    }

    $this->resetFormFields();
}
And update the form in contact-form.blade.php file
<form wire:submit.prevent="saveMessage">
    <div class="card">
        @if (Session()->has('success'))
            <div class="alert alert-success">
                {{ session('success') }}
            </div>
        @endif
        @if (Session()->has('error'))
            <div class="alert alert-danger">
                {{ session('error') }}
            </div>
        @endif
    </div>

    .....
REMEMBER: Livewire component works only if we have a single root element.
The final look.
This is the contact form after, adding some styling to it and making it looks nice.
Visit The Github Repo to download the code used in this article.
Also, take a look at my Livewire search data table
Conclusion.
Livewire has a great set of functionalities, you can do a lot of amazing things with it. Check their incredible Docs to know more and do something wonderful with Livewire.
Thank you for reaching here 👐 hope you enjoy this article and don't forget to subscribe to my newsletter to be notified about the new articles.
If you want to contribute to fixing or adding something, You can PR My blog articles repo on Github.
Don't forget to follow me on Twitter and Linkedin
Or visit my Portfolio.
Bye 👋